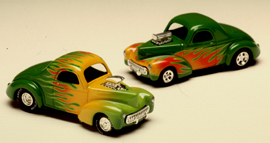
 Green Willys 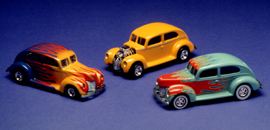 Fat Fendered 40's 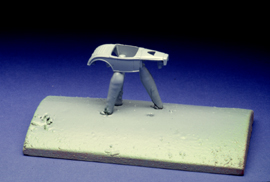 Car on Stand 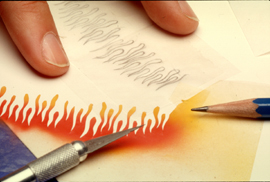 Cutouts 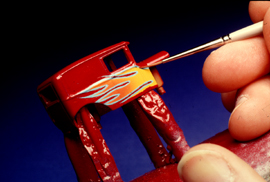 Handpainting  Tail Draggers 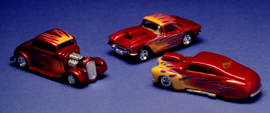 Highlight Flames 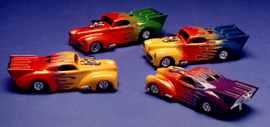 4 Willys 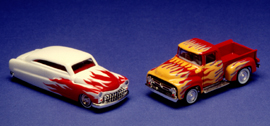 Dutch and Roth |
Customizing Your Own Cruisers I have been enjoying the art of customizing 1:64 scale cars for approximately 5 years. My love for little cars began 40 years ago as I held my first matchbox car- a red E-type jaguar. My personal interest centers on hot rods and customs, and vintage grand prix race cars. The very thought of creating my own customs has made the hobby of collecting that much more enjoyable. I will outline the major steps in creating your own cruisers. Portions of this article first appeared in Toy Cars and Vehicles, July 2000, Krause Publications. The car body is removed from its chassis with a dremel burr or drill bit. The body is dunked into paint stripper, suspended by wire. Approximately ten minutes later, the body is removed, carefully rinsed, scrubbed with an old toothbrush and dried. Any paint left in the seams of the car (panels, doors, grill) is picked away with an old x-acto knife. Windows, wheel wells and other openings are smoothed with small jewelers files. Other imperfections are corrected as needed. Steel wool, fine grit sand paper or a dremel steel brush further smooths the car body. Wheel selection is important. The variety of rims and wheels can enhance the attitude and altitude of your hot rod. Donor wheels can come from a variety of sources: Racing Champions, Johnny Lightning and Hot Wheels. Remove the wheels and axles from both the recipient and donor chassis' with either an x-acto blade (plastic chassis) or a side-cutting dremel bit (metal). Place the new set of wheels in place with the stripped metal car body to check the look and fit. Remember to consider the thickness of the paint and clear coat to come. Place the new set of wheels in place and glue in place. If necessary, cut axles to fit and super glue in place. If the wheels are not free wheeling on their axles, make a sleeve from metal or plastic tubing or roll up a small amount of masking tape-sticky side out- and then glue in place. The axles and wheels should slide and roll easily now. The car body is placed on a paint stand made from nails attached to a block of wood. The stand provides a hands-off means for supporting and turning the car while paint is being sprayed. An added extra may include a cheap plastic lazy susan to place under the paint stand which allows controlled turning during the painting process. For best results, the paint can be warmed for a few minutes in a pan with a few inches of hot water (not on the stove!). This thins the paint allowing primer and other coats to go on smoothly. The stand is placed in a well ventilated spray hood. Without starting or stopping on the car body, begin a continuous spray back and forth spraying past the car body, turning it slightly as you go. Spray carefully but lightly into all of the nooks and crannies. Follow the directions on the aerosol can for best results. Allow the car to dry for 48 hours before further painting. For a flamed hot rod, the area of the car to be painted is traced on tracing paper. Sketches of proposed flames or designs are then doodled. The final sketch is placed over the body panel, fenders, or hood -checked for placement. A small piece of frisk film, is cut and placed directly over the sketch. Using a sharp #11 x-acto knife, the flame is carefully cut out. This newly made mask with its opening is carefully positioned on to the area of the car to be airbrushed. For the opposite side of the car, the drawing is flipped over and retraced. Frisk film is reapplied to the sketch and the shape is again cut out. Save the cut out flames- they can be used on other customs. The portions of the body which are not to be painted can be covered and protected with low tack masking tape. Airbrushing proceeds. Solid or fading colors can be applied, whichever matches your creativity. Keep your coats thin and allow them to dry between applications to minimize an edge on the flame. After a few minutes of drying time, the masks are carefully removed. Invariably over-spray from the airbrush will creep under your masks and into crevices. I have found Oops, latex remover works great for clean up. With a small amount of the fluid on a small brush you can wipe away the over-spray and further shape your flames. An alternative is to sharpen the flame edges with the same color used on the body. To add another look to your flames and graphics, add a small pin stripe or outline. The color of the outline can match your car's interior or be a darker or lighter shade of the body color. Apply the color with a small brush carefully pulling the color along the outline. Because this is close-up work, I wear an Optivisor which magnifies the the car by two times. Patience is a virtue, so take your time and enjoy the process. Alternate approaches will give your little hot rod a different look: outline only the top or the bottom of the flame. A light color on top can highlight while a darker color under the flame adds a shadow effect. Use your imagination--its your car with no rules! The flames which were previously cut out of the frisk can be placed onto your cruiser to serve now as the new mask and the flame color. Left: Frisk film was applied, masking the white car body leaving flame openings and purple enamel was airbrushed. Masking was removed and each of the flames was outlined with green with a small brush. Right: Portions of the body and flames were covered in frisk film using a pre-existing cut-out flame and masking tape. The body was airbrushed with red. The masks were removed and the flames were outlined with yellow streaking lines. Both cars dried for 2 days, were clearcoated and then reassembled. Here's a short cut to the painting process- find the car you like already factory painted and remove the "tampos" or designs. First, take the car apart. Apply fingernail polish remover, brake fluid or Oops with a Q-tip. Keep the fluid away from plastic windshields. Once the designs are removed-your creativity begins. The cruising canvas is now yours to paint. Mask off or hand paint those flames and scallops. Add ready-made decals, transfers, numbers and stripes. Clearcoat, reattach and you are done - its all good! These four willys started with a factory basecoat of metallic orange with the tampos removed. I mixed up friskets, airbrushed, and the rest is just pure "flaming fun!" After 2 days of curing, the body is clearcoated with high gloss. Between coats, the car on its stand is placed under a desk heat lamp (not too close) and then recoated about every hour with a light spray, 2-3 times. This cures for at least a day and you are ready to reattach the car's body to the chassis. Keeping your hands clean, place the car body on a soft cloth upside down. Placing the chassis in place, 5-minute epoxy is applied in small drops, flush with the bottom of the chassis. Once the glue begins to set up, carefully press the chassis and body together, and your cruiser is ready to go. If you wish, paint over the glue holes with the same chassis color. Allow your car again to cure for at least a day. Here is "Von Dutch's Merc Cruiser" and "Big Daddy Roth's '56 pickup". My next installment will cover painting and detailing vintage Grand Prix race cars from the 60's and beyond. Until then,I hope you will continue to enjoy our hobby! Let's talk customs, Email me - thphelps@ medart.jhu.edu. or write to this webzine. |