Detailing Vintage Racers
by Tim Phelps, photography by Jim Durham
Aerodynamic sleek and slender road rockets epitomize speed and
endurance while conjuring up visions of rally race cars at Watkins Glen,
Sebring, Laguna Seca, and other current vintage motor sporting events. Like
great jazz music of the same time period, the race cars of the middle
fifties to the middle sixties appeal to me the most. Their distinct smooth
shapes, primary colors, combined with straight ahead graphics---what could
be more simpler than stripes and numbers. So let's make some racers.
The steps presented here follow the initial prepping and painting
steps published in last month's entry (October 2000) on Customizing Your
Own Cruisers. The paint base coat on your vintage racer has cured, for 2-3
days and you are now ready to add racing stripes and numbers. A limited
color palette helps keep the racers looking authentic. By reviewing old
photos for color matching, stripe configuration, and number size, font,
and
placement, you can add realism to your racing stable. Striping can be
achieved quite simply with number of methods: airbrushing, hobby tapes,
dry
transfer sheets, and decals. The following describes the airbrushing
process for racing stripes.
With the car body up on its stand, tape off the areas of the hood
and trunk leaving openings for the airbrush color to come. Masking tape,
scotch tape or frisket film are good barriers for use in masking for stripes.
Find the center of the car and work out from there. View the car
from both sides for symmetry as a "double check". Remember to
cover any
other areas of the car which could be exposed to overspray. Proceed with
airbrushing, working in a back and forth motion over the length of the car
for a smooth finish.. After a few minutes, carefully remove the masking
material, pulling the tape away from the stripe at a slight angle to ensure
a clean edge. Clean up any overspray with Oops latex remover or mineral
spirits on a fine brush. Dip a fine brush (0/6 0r smaller) into the liquid,
dab on a rag to remove most of the liquid, lightly dry brush along the
stripe edge, and wipe the removed color onto the rag or paper towel. Repeat
this process a few times until your edges are clean. Airbrushing allows
the
stripes to smoothly follow contours and body detail without gaps.
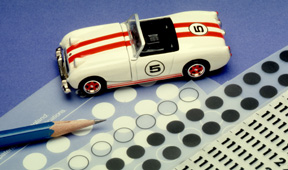
Anyone involved in the graphic art field will remember dry transfer
lettering- Presstype and Letraset - pre-computer technology. Numbers,
letters, and circles (both open and closed) come in a variety of sizes and
styles in black and white, ready to rub off onto the surface of your
choice. Choose the size of outline or solid circle which will also hold
your chosen number. Locate the center of the door panel and press into
place a section of the transfer sheet. Carefully rub a #2 pencil over the
circle. The circle, as it is being burnished, will appear to turn a lighter
shade of gray. This indicates that it is now moving from the carrier sheet
to your car panel. Once the circle is clearly on the panel, slowly remove
the sheet and rub over it lightly with a piece of tracing paper and the
pencil. The circle is now adherent to the panel, ready to accept a number.
Follow the same procedure as above. Carefully rub the number into the
center of the circle. Again lightly rub over the image with tracing paper
and a pencil. If you make a mistake or want to remove the image, Scotch
Magic tape lightly pressed over it will pull the number and circle off the
panel.
Though difficult to find now, try looking in your local art supply
store for dry transfer numbers and circles. Unfortunately, these products
have a short shelf life; the images may appear cracked or may be difficult
to remove from their carrier sheet. Test them when possible to be sure that
they still have adherent qualities. As an alternative to presstype, cut
a
frisket or use a drawing template to create solid circles and follow
airbrushing steps presented previously.
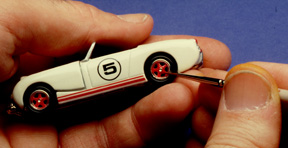
A final touch can be added on the lower door panel of your racer.
Autographics of CaliforniaTM produces sheets of thin acetate self adherent
racing stripes. These small stripes come in a variety of colors and add
a
nice racing detail. After measuring the side and door panel, cut a slightly
longer section and lightly press in place on the lower side panel or door
edge. Press the stripe into place. With a fresh x-acto blade, trim to fit
the edges and remove the excess. Like the tapes, the stripes have a
slightly raised surface, relatively unnoticeable after clearcoating. These
sheets can be found in your local hobby store or look for them on the Web.
For final added realism, a small brush is used to carefully paint the
wheel spokes to match the color of the racing stripes. This adds a nice
final touch. Finally detail the grille, headlights and tail lights with
appropriate
colors. After the car body has been clear coated and cured for at least
a
day, it is reassembled to the chassis (see preceding article- October
2000) and, it's ready for the race track or your show room!
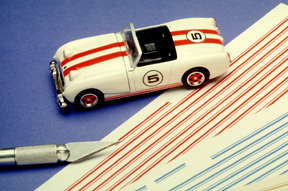
Decals, tapes and dry transfer sheets can be the least desirable
methods for racing stripes because each have problems conforming to the
body shapes, ridges and bumps. But for long stretches of flat body surface
(like Ferrari 312's and Mark VI's), they are can be quite satisfactory.
PactraTM tapes come in a variety of widths and colors. The tapes can leave
a slightly raised edge even after clearcoating, so use your descretion.
Test this method on a beater and then clearcoat it to see whether it meets
your expectations.
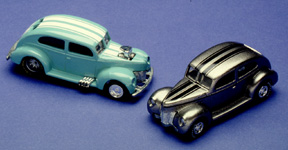
The same colorful tapes can be used in other ways to add graphics
to your racer or custom cruiser. Cleaner and more delicate lines and edges
can be achieved. These prowlers were treated to a different way of striping
or taping to enhance their stance. Mix and match body colors and striping
tapes for your own stable of racers and customs.
These viper concepts made by matchbox were modified in body style and
decorated with stripes and numbers. The roll bar on the sunburner on the
left was removed and Lee Press-on nails were attached making racing cowls
behind the seats. A corvette grill was recessed into the front end. Another
nail was attached to the hood of the racer on the right. Each was painted
and detailed in vintage colors. Each was finally dressed up with JohnnyLightning
wheels.
I couldn't help myself and added racing stripes to vintage Fat
Fendered Forty Fords for that old time drag strip look. Airbrushing would
work great too! Add some large numbers in white or black for the sake of
nostalgia. An alternative to all of the above graphic methods includes
computer technology. Artwork, symbols and even stripes can be created in
various drawing programs and laser printed onto decal sheets. I have not
used this method. So give this webzine your thoughts and results.
Our little racey froggy-eyed sprite needed some friends. These
little sport rods were flamed with masks in airbrush in the manner
described in last month's installment. If it was good enough for Von Dutch
and his 300SL Gullwing Mercedes, than it is good enough for me. A rodder
at
heart with an affection for vintage sports cars, It is all about fun! Watch
for future installments on hand painting and continue to enjoy our hobby!
Email me - thphelps@medart.jhu.edu
or this webzine, and let's talk customs.

Austin Healey Sprite (Johnny Lightning) |

Porsche 956 (Hot Wheels)

Lola T70 (Hot Wheels)
Austin Healey Sprite with numbers
Austin Healey Sprite with stripes
Austin Healey Sprite - detailing
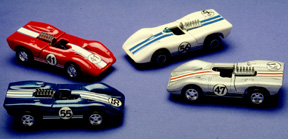
Ferrari 312P (Hot Wheels)
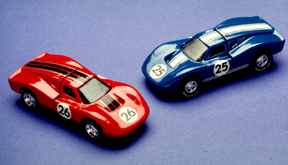
Ford GT40 Mk VI (Hot Wheels)

Plymouth Prowler (Matchbox)

Sunburner (Matchbox)
Fat Fendered 40's (Hot Wheels) |